

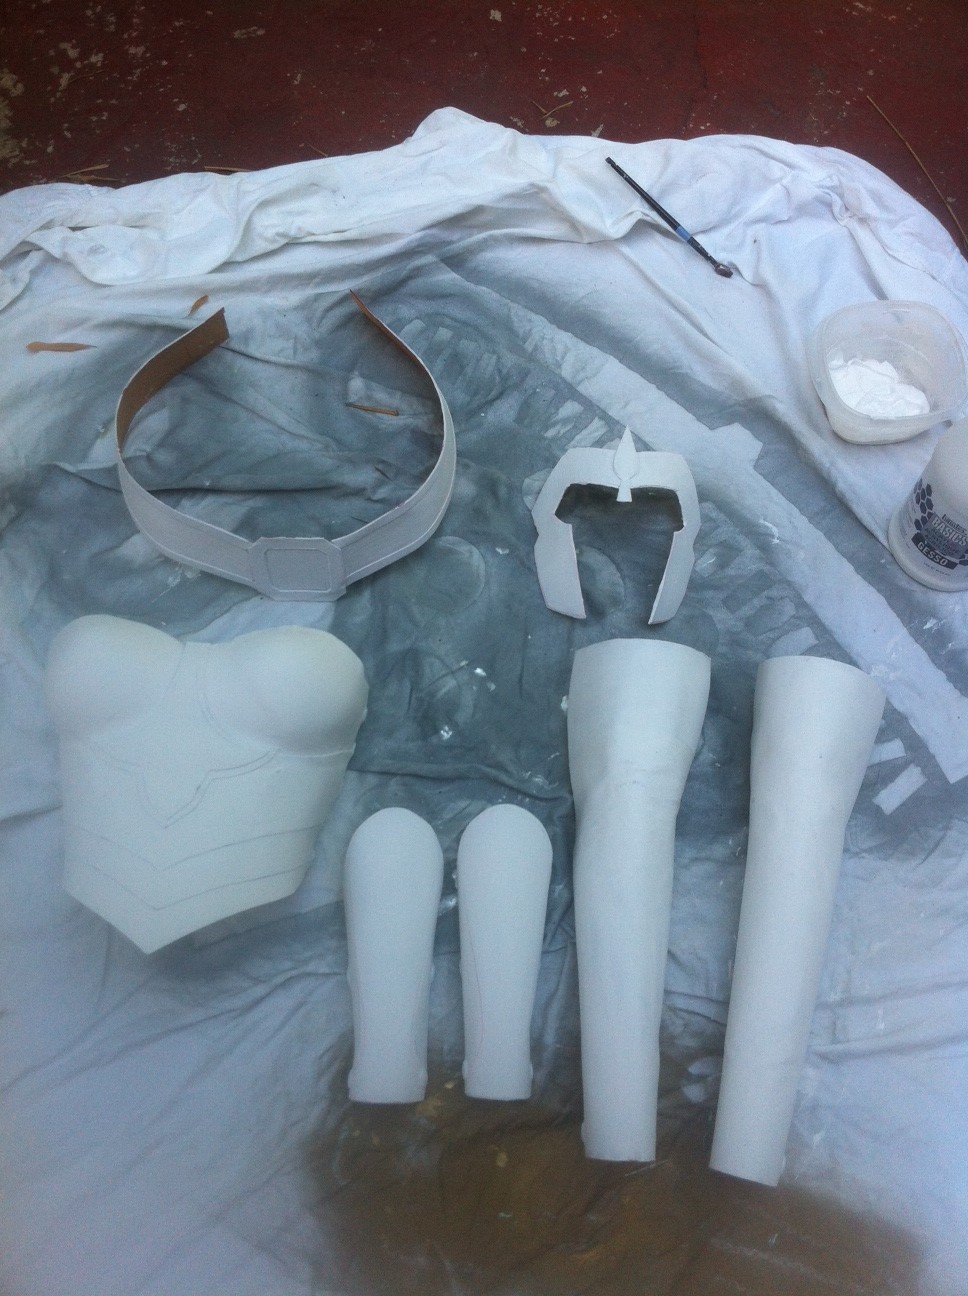
Based on the feedback I received from my Lady Skeletor tutorial, I wanted to make another post that takes a closer look at some of the armor breast plates I’ve made out of Worbla.
This isn’t really a step-by-step tutorial, as the process I use to make these breast plates is pretty straightforward (molding Worbla directly over my dress form). This is mostly just a collection of WIP photos I’ve taken while making these breast plates. NOTE: I’m usually working under pretty tight time restrictions (all of these costumes were made in under 7 days) and quite frankly I think certain pieces could have been done better, done with more detail, or done with more dimension and depth.
Here are some of the costumes I’ve made with Worbla: in chronological order from left to right – Dr. Doom, Athena, Skyrim, Skeletor. To see these actual costumes, visit my COSTUME PAGE.

Click to Enlarge
Dr. Doom was the first time I ever worked with Worbla OR attempted to make armor. It’s a very simple armor ‘bra’ that I molded over my dress form. The raised detail along the edge was added by cutting a 1-inch strip of Worbla (in the same shape as the neckline of the breast plate), heating it, and then letting it adhere to the breast plate. The metal rivets were circular metal pieces I purchased from Michael’s and then glued onto the breast plate. The entire thing was then primed with several layers of gesso, sanded, and painted with metallic spray paint. The breast plate is held to my body with elastic straps that attach to the armor with heavy duty snaps (applied with an industrial plier tool). It’s very straightforward and entirely simple:

Boobs….er, Armor Detail – Click to Enlarge
NOTE: To get the cleavage, I wear a push-up bra underneath the breast plate. COSPLAY BOOBS ARE MADE OF LIES!!
After my first attempt at armor-making was fairly successful, I decided to make a more detailed and complex costume — Athena from Dynamite Comics. Here are some close-ups of the breast plate:

Click to Enlarge
I pinned tissue paper to my dress form (loosely, as tissue paper does not stretch and won’t lay flush along the curves of the dress form) and drew out my basic shape for the breast plate. I then transferred that pattern onto Worbla, cut it out, and molded the Worbla over the dress form. NOTE: My boobs are bigger than my dress form’s, so I pad the bust with THREE bras to increase the bust size.
As you can see from the detail images, Athena’s armor attaches to her with white straps. I took the breast plate off the dress form (at this point there was only one layer of Worbla) and installed six heavy duty snaps onto each side (the matching snaps were put on elastic straps covered in white spandex to attach to the breast plate and hold it onto my body).
To get the layered look on the breast plate (the three layers underneath the bust and the fleur-de-lis-like design in between the boobs), I cut those shapes out of Worbla and also molded them onto the breast plate.

Click to Enlarge
I primed the breast plate with multiple layers of gesso, let it dry fully, and then sanded the crap out of it to make it was smooth as possible. Gesso is very thick, so if you don’t sand it you’ll still be able to see brushstrokes on the armor after it is painted.
Click to Enlarge
I then spray painted the breast plate (and other armor pieces) with metallic gold paint and let it dry. I applied a slight about of black paint along the raised edges and buffed them with a cloth to slightly weather the armor. This picture also shows pretty clearly how the elastic straps attach to the armor:

Click to Enlarge
While I was finishing up the Athena costume, I went insane and decided to make a Skyrim costume as well (to wear at SDCC 2013). I always loved the Savior’s Hide armor design and picked that to make. In truth, I don’t really think that my breast plate is a very accurate representation of the detail and complexity of the original design. It should be more 3-dimensional and I honestly should have sculpted a lot of the element out of clay to give it the right look. But, I also had two days to make this costume so…whatever.
The key different between the Skyrim armor and the other breast plate is that it is essentially a corset made out of Worbla. It wraps entirely around my torso and laces up in the back like a corset (I cover the lacing with an additional Worbla piece that velcros onto the back).
So yeah, I cut my base piece out of Worbla and molded it onto my dress form. From there, I sketched the design of the armor directly onto the Worbla to make sure it looked right. As you can see, this took me several tries:

Click to Enlarge
If you look close at this picture, you can also see some of the wrinkling that can occurred when you shape Worbla around non-flat surfaces. You can to be very careful to try and avoid this, as these flaws are hard to cover. In this case, I knew that I was going to be layering quite a few more pieces of Worbla onto the front of the armor, so I didn’t worry about it too much.
I transferred the design onto tissue paper, then again transferred it onto another sheet of Worbla.

Click to Enlarge
This design was translated onto the breast plate in several stages. You can see all the pieces I used here:

Click to Enlarge
This is what the armor looked like after all six of those pieces were molded onto the breast plate:

Click to Enlarge
As you can see, six layers of Worbla more than covered the wrinkles that were present on the base layer. I also cut out a series of diamond-shaped scale things and attached them along the bust line of the breast plate:

Click to Enlarge
The armor was then primed with gesso. I glued four circular coins onto the armor to add in a bit of detail, but this was all done on WEDNESDAY (SDCC started on Thursday, I was running out of time fast!). Then, of course, the armor was sanded a bit (but not as much as it should have been, I didn’t have time):

Click to Enlarge
Literally, the night before we were going to leave for SDCC, I painted this armor with metallic silver spray paint:

Click to Enlarge

Click to Enlarge
As you can see, the gesso wasn’t sanded smooth enough in certain areas and you can still see brush strokes. Since it’s Skyrim armor, that’s ok because it doesn’t need to be perfectly smooth.

Click to Enlarge
I woke up at 4am and packed this into the car. Howard and I drove down to San Diego and enjoyed the first day of the con. That night, I added in the weathering details to the armor with black paint:

Click to Enlarge
Overall, I would say I consider the Skyrim armor to be moderately successful. It looks good on, but there are many details that I don’t think I did a good job translating into reality. The armor is too flat and many of the details should have more dimension and depth. I also chose a construction method that used a LOT of Worbla (which is pretty expensive). If I were to make this again, I’d definitely do a lot of things differently!

Click to Enlarge
To date, I would say Athena and Lady Skeletor are my two most successful armor costumes. The most important element of cosplay is the determination to try new techniques and push yourself to do better with each and every costume you make. Sometimes things might not work out 100% and the process of learning can definitely be frustrating. But with a bit of commitment and determination, there’s no limit to what you can do!
If you’d like to see the detailed tutorial on how I made Lady Skeletor, CLICK HERE!
Tags: armor, athena, constantine, constantine in tokyo, constantineintokyo, cosplay, cosplay tutorial, costumes, marvel, skeletor, skyrim, tutorial, worbla, worbla armor tutorial
Re'Nell
You are absolutely GORGEOUS!!!!!!
nicole
thanks for the info 🙂 what do you cut your Worbla with?
ConstantineInTokyo
I just use regular scissors and sometimes an exacto knife for more detailed areas. Worbla really isn’t very thick, so you don’t need special tools to cut it. I might, however, experiment with using a dremel at some point. =)
nicole
thank you for the response! you’re awesome
tiff
Thank you for these helpful tutorials!!!
YOU AND YOUR COSPLAYS ARE AWE-SOME!
ConstantineInTokyo
Thank you! <3
Melody
This is so awesome! Thank you for the tutorial! ^^ I was wondering, though, if you do the typical “worbla-craft foam-worbla” for the breast plates or if you just do worbla? o:
ConstantineInTokyo
For the breastplates, I just use Worbla and no craft foam – I feel that using only worbla helps get a closer fit to the shape of the dress form. For other armor pieces (gauntlets, pauldrons, etc), I use worbla and craft foam — you can see that process on my ‘Lady Skeletor Tutorial!’ <3
Stephanie
I’m looking into materials for making superhero armor, and I had a question. What made you choose Worbla over Wonderflex? Is it just price? (I haven’t looked at pricing for either material. I’m still trying to figure out what I’d use for the look I want.) Or something else?
ConstantineInTokyo
One of the major differences between worbla and wonderflex is that wonderflex has a fiber weave in it – kinda similar to fabric, whereas worbla does not. This makes worbla much easier to bend and shape into certain pieces, as you don’t have to worry about the fibers. I’m not sure what kind of armor you want to make, but overall I’ve only heard positive reviews of worbla!
Stephanie
I was looking at something like this (the woman’s costume):
http://www.propmasters.net/popup_image7.php?pID=2025&osCsid=4076e84bc733a6f4f0cce59b71ed4877
But with a different color scheme. I’m not sure worbla’s the best option (still new to cosplaying) but yeah.
Thanks for the information about the worbla!
Kit Ann
I was wondering for the Savior’s Hide chest piece, how much worbla you used. I was looking into getting some for a similar size chest piece but I was having a hard time gauging how much I would need. Thanks!!!
Oh and….you’re saviors hide def inspired me to buy some spur of the moment fur and now I have a skyrim cosplay upcoming. 🙂 You are awesome!!!
ConstantineInTokyo
Yay! I look forward to seeing your Skyrim costume!
For the Savior’s Hide breastplate, I used about half of a jumbo-sized piece of worbla (39.25″ wide x 59″ long). If you use craft foam for the details and are careful with how you cut out the pieces, you could do it with even less!
Shaminh
How did you managed to form the worbla on your mannequin without getting them stick together ? q_q
ConstantineInTokyo
Worbla doesn’t permanently stick to fabric – mostly, it will just bond to itself or other kinds of plastic. My dress form is covered in fabric, so once the worbla cools I can just pull it off of the form. I’ve made around 5 breastplates on my dress form and the worbla has never damaged it even slightly! So I think it’s definitely a safe method, though I’d recommend using a hair dryer rather than an industrial strength heat gun!
Bridget Wuerdeman
I am making a Skyrim Daedra chestpiece and using Worbla for the 1st time. I also have large breasts and was wondering how to get the breast shape with heating the worbla. My dress form is covered with reddish fabric and i have placed old bra on it for proper clothing fittings.
Gelli
Amazing, guuuurl! * D * <333 You have thought me well!
I have one question tho! Hope you don't mind D:
I am planing on cosplaying a character with a strapless breast plate (Aisha ClanClan), but the back on her breast plate is closed so I can not do as you did on your awesome Athena cosplay.
Any thought on this mather? (Preferably something that can hold up heavy breasts)
I have trouble coming up with something that will make it steady enough so I do not have to worry about those fuckers jumping out. X'333
Darby
I was wondering if the worbla was very flexible? In the corset like one it seems to go all the way around. So how do you get into it? I have never worked with worbla and am hesitant to buy any before extensive research and everywhere I’ve looked said it was extremely stiff but can also by fragile. Any advise? I am very curious as to how you fit into that corset.
Eleebz Wathered
this tutorial actually helped me a lot but I was just wondering what size sheet of worbla you used for the gold breast plate. I’m making something kinda similar and I don’t know how much I should get
Robin
Thank you so much for posting your tutorials! I am just getting into the world of cosplay and about to embark on my first worbla armor build.
Any tips you can share on attaching shoulder pieces to fabric so they can be removed to allow for the shirt to be laundered?
Treatment For Foot Pain
Great information. Lucky me I discovered your site by chance (stumbleupon).
I’ve bookmarked it for later!
Steph
Hey, awesome pieces!
I ha da quick question for you! If I don’t have a dress form can I shape the worbola on myself do you think? Or is it to hot during the process? Thanks! 🙂
Eva
I’m trying to make a breastplate with wonderflex… I know worbla works a lot better because it stretches and forms better but wonderflex is all I have, do you have any tips??
cucu
Thanks for every other informative web site. Where else could I am getting that kind of information written in such an ideal manner?
I’ve a project that I’m simply now working on, and I
have been at the look out for such info.
Chantelle
Hey. I was wondering if you doubled up the worbla for the corset one.